Introduction
Running a KVM host with multiple VMs requires careful security configuration. This guide documents real-world challenges including network instability, firewall issues, and a tricky dual-NIC routing problem on a mail server VM.
Part 1: Initial Server Setup & Network Configuration
Understanding Your Network Layout
┌─────────────────────────────────────────────────────────────┐
│                    ROCKY LINUX KVM HOST                     │
│                                                             │
│  ┌──────────┐    ┌──────────┐                               │
│  │   br0    │    │   br1    │  (Linux Bridges)              │
│  │ LAN Zone │    │ WAN Zone │                               │
│  └────┬─────┘    └────┬─────┘                               │
│       │               │                                     │
│  ┌────┴─────┐    ┌────┴───-──┐                              │
│  │  eno1    │    │  eno2     │  (Physical NICs)             │
│  │ 10.0.0.x │    │203.0.113.x│                              │
│  └──────────┘    └───────-───┘                              │
│                                                             │
│  ┌──────────────────────────────────────────────┐           │
│  │              VIRTUAL MACHINES                │           │
│  │  ┌────────┐ ┌────────┐ ┌────────┐ ┌────────┐ │           │
│  │  │Windows │ │Windows │ │Windows │ │ Linux  │ │           │
│  │  │ Server │ │   10   │ │ 2008   │ │  Mail  │ │           │
│  │  │ (LAN)  │ │ (LAN)  │ │ (LAN)  │ │LAN+WAN │ │           │
│  │  └────────┘ └────────┘ └────────┘ └────────┘ │           │
│  └──────────────────────────────────────────────┘           │
└─────────────────────────────────────────────────────────────┘
Step 1: Configure Firewalld
# Start and enable firewalld
systemctl enable firewalld --now

# Remove unnecessary services
firewall-cmd --permanent --remove-service=dhcpv6-client
firewall-cmd --permanent --remove-service=ssh

# Add your custom SSH port (change to your port)
firewall-cmd --permanent --add-port=2222/tcp

# Reload
firewall-cmd --reload

# Verify
firewall-cmd --list-all
Pro tip: Using a non-standard SSH port drastically reduces automated brute force attacks.
Step 2: Configure Fail2Ban for Brute Force Protection
# Install fail2ban
dnf install fail2ban -y

# Create configuration
cat > /etc/fail2ban/jail.local << 'EOF'
[DEFAULT]
bantime = 604800        # 1 week ban
findtime = 3600         # Look back 1 hour
maxretry = 3            # 3 failures = ban
[sshd]
enabled = true port = 2222 # Your custom SSH port logpath = /var/log/secure maxretry = 3 bantime = 604800
[recidive]
enabled = true logpath = /var/log/fail2ban.log bantime = 604800 findtime = 604800 maxretry = 2 EOF # Start and enable systemctl enable fail2ban --start fail2ban-client status sshd
Step 3: Enable SELinux Enforcing
# Check current status
getenforce

# Set to enforcing
setenforce 1
sed -i 's/SELINUX=permissive/SELINUX=enforcing/' /etc/selinux/config

# Verify
getenforce
Part 2: VM Network Isolation
Block Lateral Movement Between Windows VMs
# Replace 192.168.1.0/24 with your actual LAN subnet
firewall-cmd --permanent --add-rich-rule='rule family="ipv4" source address="192.168.1.0/24" destination address="192.168.1.0/24" port port="3389" protocol="tcp" drop'  # RDP
firewall-cmd --permanent --add-rich-rule='rule family="ipv4" source address="192.168.1.0/24" destination address="192.168.1.0/24" port port="445" protocol="tcp" drop'   # SMB
firewall-cmd --permanent --add-rich-rule='rule family="ipv4" source address="192.168.1.0/24" destination address="192.168.1.0/24" port port="139" protocol="tcp" drop'   # NetBIOS
firewall-cmd --permanent --add-rich-rule='rule family="ipv4" source address="192.168.1.0/24" destination address="192.168.1.0/24" port port="135" protocol="tcp" drop'   # RPC

firewall-cmd --reload
This prevents a compromised Windows VM from spreading to others using common lateral movement techniques.
Part 3: Diagnosing Network Issues
The Problem: VMs Suddenly Inaccessible
I encountered a frustrating issue where all VMs became inaccessible despite appearing to run normally.
Diagnostic Commands
# Check VM status
virsh list --all

# Check bridge interfaces
brctl show
ip link show | grep vnet

# Check ARP resolution
arp -n
arping -I br0 -c 3 <VM_IP>

# Check packet counters
ip -s link show vnet0

# Check firewall rules
iptables -L FORWARD -n -v
Common Culprits
| Symptom | Likely Cause |
|---|---|
| VM not responding to ping | Network service down inside VM |
| ARP incomplete | VM network stack hung |
| VNet TX packets but no RX | VM firewall blocking |
| All VMs inaccessible | Host bridge/firewall issue |
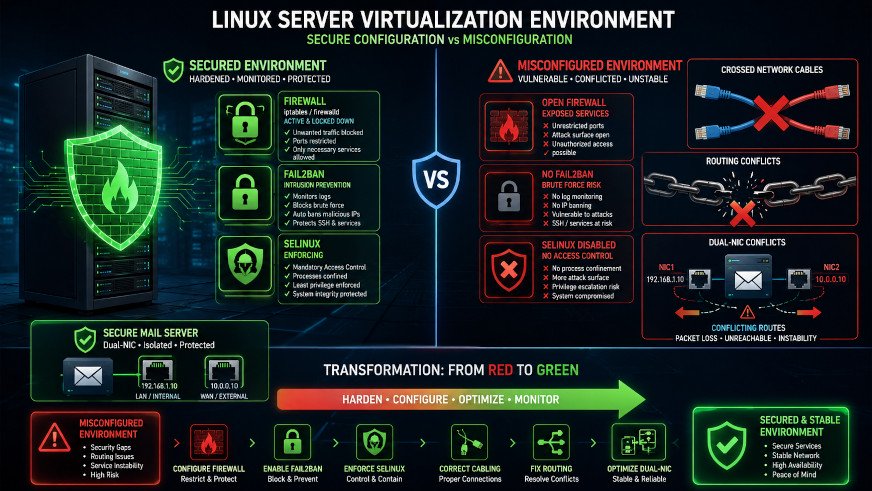
Part 4: Fixing Dual-NIC Mail Server Routing
The Problem
My mail server had two network interfaces:
- WAN interface: Public IP
- LAN interface: Private IP (10.0.0.x)
When both interfaces were up, the VM would stop responding because both had default gateways, causing routing conflicts.
The Solution: Remove Gateway from LAN Interface
Option A: Using NetworkManager
# Inside the VM, modify the LAN connection
nmcli connection modify eth1 ipv4.never-default yes
nmcli connection modify eth1 ipv4.ignore-auto-routes yes

# Restart the connection
nmcli connection down eth1
nmcli connection up eth1

# Verify only one default route
ip route | grep default
Option B: Using ifcfg files
# Edit LAN interface config
vi /etc/sysconfig/network-scripts/ifcfg-eth1

# Ensure it contains:
DEVICE=eth1
BOOTPROTO=static
ONBOOT=yes
IPADDR=10.0.0.10
NETMASK=255.255.255.0
DEFROUTE=no          # Critical: no default route
# No GATEWAY= line!

# Restart network
systemctl restart network
Option C: Manual fix (temporary)
# Remove conflicting default route
ip route del default via 10.0.0.1 dev eth1

# Ensure correct default route
ip route add default via 203.0.113.1 dev eth0
Verification Commands
# From host, test connectivity
ping -c 3 <VM_PUBLIC_IP>
nc -zv <VM_PUBLIC_IP> 25

# Inside VM, verify routes
ip route show
# Should show only one default route
Part 5: Fixing Physical Network Issues
The Problem: Intermittent Network Flapping
My logs showed constant "Link is Up/Down" messages on the WAN interface, causing firewalld and fail2ban to crash.
# Check for CRC errors
ethtool -S eno2 | grep -E "crc|error"

# Check link speed
ethtool eno2 | grep Speed
If Speed Shows 100Mb/s Instead of 1000Mb/s:
- Replace the network cable with Cat5e or Cat6
- Try a different switch port
- Reseat both ends of the cable
Temporary workaround while debugging:
# Force stable speed
ethtool -s eno2 speed 100 duplex full autoneg off

# Make permanent
cat > /etc/NetworkManager/dispatcher.d/50-fix-interface << 'EOF'
#!/bin/bash
if [ "$INTERFACE" = "eno2" ] && [ "$2" = "up" ]; then
    ethtool -s eno2 speed 100 duplex full autoneg off
fi
EOF
chmod +x /etc/NetworkManager/dispatcher.d/50-fix-interface
Part 6: Emergency Recovery Procedures
If Firewalld Crashes
# Stop and clean
systemctl stop firewalld
rm -f /etc/firewalld/direct.xml

# Restart
systemctl start firewalld

# Re-add SSH port
firewall-cmd --permanent --add-port=2222/tcp
firewall-cmd --reload
If You Get Locked Out of SSH
Have someone with physical/console access run:
systemctl stop firewalldIf VM Disk is Corrupted
# Check disk
qemu-img check /path/to/vm.qcow2

# Repair
qemu-img check -r all /path/to/vm.qcow2

# Mount to recover data
modprobe nbd
qemu-nbd -c /dev/nbd0 /path/to/vm.qcow2
mount /dev/nbd0p1 /mnt
# Copy data, then unmount
Part 7: Health Monitoring Script
cat > /root/health-check.sh << 'EOF'
#!/bin/bash
echo "═══════════════════════════════════════════════════════"
echo "              SYSTEM HEALTH CHECK"
echo "═══════════════════════════════════════════════════════"
echo ""
echo "🔥 FIREWALL:"
echo "   Status: $(systemctl is-active firewalld)"
echo "   Ports:  $(firewall-cmd --list-ports 2>/dev/null)"
echo ""
echo "🛡️  FAIL2BAN:"
echo "   Status: $(systemctl is-active fail2ban)"
fail2ban-client status sshd 2>/dev/null | grep -E "Currently banned|Total banned"
echo ""
echo "🔒 SELINUX:"
echo "   Mode:   $(getenforce)"
echo ""
echo "💻 VMs:"
virsh list --name --state-running | while read vm; do
    [ -n "$vm" ] && echo "   ✓ $vm"
done
echo ""
echo "📡 NETWORK:"
echo "   Speed:  $(ethtool eno2 2>/dev/null | grep Speed | awk '{print $2}')"
echo "   Errors: $(ethtool -S eno2 2>/dev/null | grep rx_crc_errors | awk '{print $2}')"
echo ""
echo "═══════════════════════════════════════════════════════"
EOF

chmod +x /root/health-check.sh
Part 8: Quick Reference Card
cat > /root/admin-reference.txt << 'EOF'
╔══════════════════════════════════════════════════════════════╗
║              KVM HOST ADMINISTRATION REFERENCE               ║
╚══════════════════════════════════════════════════════════════╝

🔐 CHECK SECURITY:
   /root/health-check.sh

🔥 FIREWALL:
   firewall-cmd --list-all
   firewall-cmd --add-port=XXXX/tcp --permanent

🛡️ FAIL2BAN:
   fail2ban-client status sshd
   fail2ban-client set sshd unbanip X.X.X.X

🔒 SELINUX:
   getenforce
   ausearch -m avc -ts recent

💻 VMs:
   virsh list --all
   virsh start <vm>
   virsh console <vm>

📡 NETWORK:
   ping -c 3 <VM_IP>
   nc -zv <VM_IP> 25

🔄 RESTART SERVICES:
   systemctl restart firewalld
   systemctl restart fail2ban
EOF
Summary Checklist
| Task | Status |
|---|---|
| ✅ Install and configure firewalld | Done |
| ✅ Configure fail2ban for SSH | Done |
| ✅ Enable SELinux enforcing | Done |
| ✅ Block VM lateral movement | Done |
| ✅ Fix physical network issues | Done |
| ✅ Configure dual-NIC routing correctly | Done |
| ✅ Create health monitoring script | Done |
Key Takeaways
- Non-standard SSH ports + fail2ban dramatically reduce attacks
- SELinux enforcing is safe if you test first
- Dual-NIC VMs must have only one default gateway
- Physical layer issues can cause software problems
- Always have console access when configuring firewalls
- Document everything - future you will thank present you
Common Pitfalls to Avoid
| Pitfall | Solution |
|---|---|
| Forgetting to whitelist your IP | Always have console or out-of-band access |
| Disabling SELinux permanently | Fix policies, don't disable |
| Using default SSH port | Change to non-standard port |
| Ignoring physical layer issues | Check cables and CRC errors first |
| Multiple default gateways | Only one default route per VM |
Resources
Conclusion
Securing a KVM host requires attention to multiple layers: firewall, intrusion prevention, mandatory access control, VM isolation, and proper network configuration. The dual-NIC routing issue is particularly subtle and can cause frustrating connectivity problems.
The key lessons I learned:
- Always verify physical layer first - cables cause weird problems
- Dual-NIC VMs need careful routing - only one default gateway
- Test SELinux in permissive mode first before enforcing
- Keep emergency recovery procedures handy - you will need them
This guide was written based on real-world experience securing a Rocky Linux 10.2 KVM host with 4 VMs, including a dual-homed mail server. All IP addresses have been sanitized for public sharing.
Last Updated: June 2026