
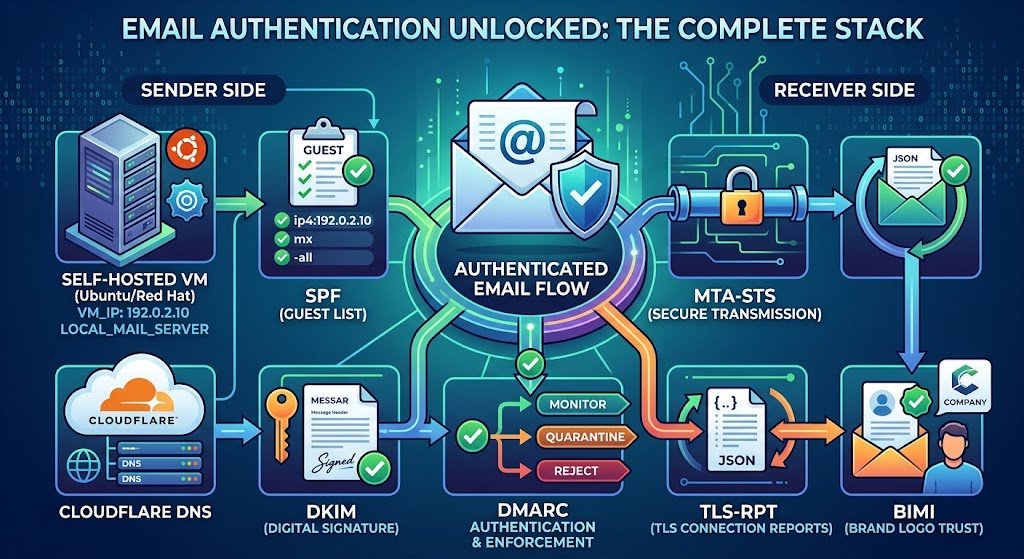
Email authentication transforms a vulnerable mail server into a secure, trusted sender. When operating a self-hosted mail server on a Linux distribution like Ubuntu or Red Hat, implementing the full suite of authentication protocols is mandatory for reliable inbox delivery and protection against spoofing.
Here is a step-by-step breakdown of what each protocol does, its benefits, and how to configure it on your self-hosted VM and Cloudflare DNS.
1. Sender Policy Framework (SPF)
What it is: SPF acts as a guest list for your domain.It is a DNS record specifying which IP addresses or servers are authorized to send emails on behalf of your domain.
Benefits: It prevents attackers from easily spoofing your domain by rejecting unauthorized sending servers at the receiving gateway.
Self-Hosted VM Setup:
- Identify your mail server's public outbound IPv4/IPv6 address (e.g.,
203.0.113.10). - No local software configuration is required on the VM for SPF; this is purely a DNS declaration.
Cloudflare Setup:
Create a TXT record at the root (@) of your domain:
- Name:
@ - Value:
v=spf1 mx ip4:203.0.113.10 -allThis authorizes your MX records and your specific VM IP to send mail, and explicitly rejects (-all) any others.
2. DomainKeys Identified Mail (DKIM)
What it is: DKIM attaches a cryptographic digital signature to the header of every outgoing email.The receiving server uses a public key stored in your DNS to verify the signature.
Benefits: It proves that the email actually originated from your domain and that the message content was not altered in transit.
Self-Hosted VM Setup (Ubuntu/Red Hat):
- Install OpenDKIM on your server.
- Ubuntu:
sudo apt install opendkim opendkim-tools - Red Hat:
sudo dnf install opendkim
- Ubuntu:
- Generate a 2048-bit RSA key pair for your domain using a selector (e.g.,
mail):opendkim-genkey -s mail -d example.com -b 2048 - Configure your Mail Transfer Agent (Postfix or Exim) to route outgoing mail through the OpenDKIM service via a local socket so it can sign the outgoing messages.
- Extract the public key from the generated
.txtfile.
Cloudflare Setup:
Create a TXT record using the selector you chose:
- Name:
mail._domainkey - Value:
v=DKIM1; h=sha256; k=rsa; p=MIIBIjANBgkqhkiG9w0B... (paste your public key here)
3. Domain-based Message Authentication, Reporting, and Conformance (DMARC)
What it is: DMARC enforces SPF and DKIM. It tells the receiving server exactly what to do if an email fails authentication (monitor, quarantine, or reject) and instructs it where to send diagnostic reports.
Benefits: Gives you absolute control over your domain's email reputation and provides visibility into spoofing attempts.
Self-Hosted VM Setup:
DMARC for sending is entirely DNS-based, so there is no software to install on the VM. However, to process incoming DMARC reports, you will either need a dedicated mailbox on your server or a third-party DMARC parser.
Cloudflare Setup:
Create a TXT record:
- Name:
_dmarc - Value:
v=DMARC1; p=reject; rua=mailto:reports@example.com; fo=1(Best Practice: Always start withp=nonefor a few weeks to monitor traffic before upgrading top=quarantineorp=reject).
4. Brand Indicators for Message Identification (BIMI)
What it is: BIMI allows organizations to display a verified brand logo next to their messages in compatible email clients.
Benefits: Builds immediate visual trust with recipients, boosts open rates, and protects brand identity.
Self-Hosted VM Setup:
- Create a perfectly square version of your logo in the highly restrictive SVG Tiny PS format.
- Obtain a Verified Mark Certificate (VMC) from a Certificate Authority, which requires proving legal ownership of a registered trademark.
- Host the SVG file and the
.pemcertificate on your VM's web server (Nginx or Apache) over a secure HTTPS connection.
Cloudflare Setup:
Create a TXT record pointing to the assets hosted on your VM:
- Name:
default._bimi - Value:
v=BIMI1; l=[https://example.com/logo.svg](https://example.com/logo.svg); a=[https://example.com/certificate.pem](https://example.com/certificate.pem);
5. Mail Transfer Agent Strict Transport Security (MTA-STS)
What it is: MTA-STS forces external mail servers to use a secure TLS connection when delivering emails to your server.
Benefits: Prevents Man-in-the-Middle (MITM) downgrade attacks that attempt to intercept emails in plain text.
Self-Hosted VM Setup:
- Ensure your mail server (Postfix/Exim) is configured to accept TLS 1.2 or higher with a valid SSL/TLS certificate.
- Set up a virtual host in Nginx/Apache for the subdomain
mta-sts.example.com. - Create a text file served at
[https://mta-sts.example.com/.well-known/mta-sts.txt](https://mta-sts.example.com/.well-known/mta-sts.txt)containing your policy:
Plaintextversion: STSv1 mode: enforce mx: mail.example.com max_age: 86400
Cloudflare Setup:
Instead of managing a web server on your VM just for a text file, you can easily deploy a free Cloudflare Worker to serve the mta-sts.txt file directly from the DNS edge. Once the file is live, announce the policy by creating a TXT record:
- Name:
_mta-sts - Value:
v=STSv1; id=2026090201;(You must update this ID number anytime you modify the text file).
6. TLS Reporting (TLS-RPT)
What it is: TLS-RPT works alongside MTA-STS. It provides a mechanism for other mail servers to email you diagnostic reports if they encounter TLS connection errors when trying to deliver mail to you.
Benefits: Alerts you to connection failures, expired certificates, or active routing attacks before they cause massive email loss.
Self-Hosted VM Setup:
Set up an alias or a dedicated inbox on your VM (e.g., tls-reports@example.com) to receive these daily JSON reports.
Cloudflare Setup:
Create a TXT record to specify where the external servers should deliver the reports:
- Name:
_smtp._tls - Value:
v=TLSRPTv1; rua=mailto:tls-reports@example.com;
Implementing this full stack ensures your self-hosted infrastructure meets modern enterprise security standards, protecting both your server's IP reputation and your recipients' inboxes.